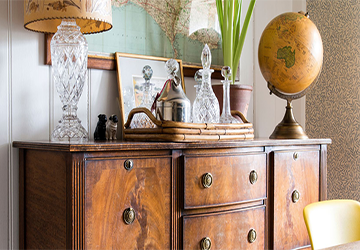
How to Restore Antique Furniture to Its Former Glory
Antique furniture carries a piece of history within its wood and design. Each scratch, dent, and patina tells a story of times gone by. Restoring these treasures to their former glory requires a mix of patience, a bit of elbow grease, and some simple tools. In this guide, we'll walk you through the steps to bring your antique furniture back to life without getting lost in a maze of complicated techniques.
Step 1: Assess the Situation
Before diving in, take a good look at the piece. Identify the overall condition and the extent of the damage. Is it surface dirt and wear, or are there deep scratches, broken parts, or missing pieces? Knowing what you're dealing with will help you plan the restoration process.
Assessment is key. Take photographs from different angles and note down the issues you see. This will serve as your roadmap throughout the restoration journey.
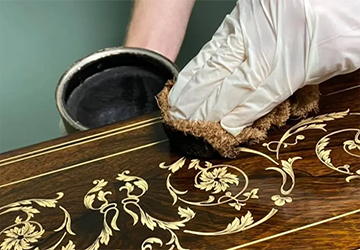
Step 2: Clean with Care
Start by giving your furniture a gentle cleaning. Use a soft cloth to remove dust and grime from the surface. A mixture of warm water and mild dish soap can help if there are tough spots. Be sure to wring the cloth well, as excess moisture can harm the wood. Avoid harsh chemicals that can strip the finish.
Remember, less is more when it comes to moisture. Don't oversaturate the wood; always dry it thoroughly with a clean cloth after cleaning.
Step 3: Repairing Scratches and Dents
You can use simple techniques to improve the appearance of minor scratches and dents. A mixture of equal parts distilled vinegar and olive oil can work wonders. Apply it to the affected area and let it sit for a day. Wipe off the excess and see the scratches blend in. For deeper scratches, consider using a matching wood filler. Apply it, let it dry, and sand it gently for a smooth finish.
Patience is your friend here. Let the vinegar and oil mixture do its magic, and resist the urge to rush through the process. The same goes for the wood filler – take your time to achieve a seamless repair.
Step 4: Dealing with Stains
Stains can mar the beauty of your antique furniture. To remove water rings or light colors, mix toothpaste with baking soda and gently rub the area with a soft cloth. A mixture of oxalic acid (wood bleach) and water can lighten the blemishes for more stubborn stains. Always test any solution on a hidden area before applying it to the visible parts.
Testing is non-negotiable. Make sure your chosen stain removal method doesn't cause more harm than good by trying it out on an inconspicuous spot.
Step 5: Restoring the Finish
The finish of antique furniture can fade over time. To restore it, lightly sand the surface with a fine-grit sandpaper. This removes any existing finish and prepares the wood for a new one. Apply a thin layer of wood stain or finish that matches the original color. Let it dry completely before moving on.
Sanding is like laying the foundation for a house. Take your time and sand evenly to ensure an even and smooth finish.
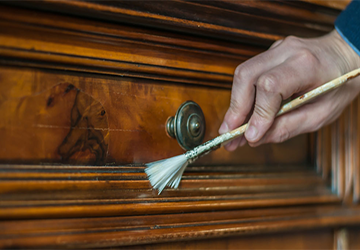
Step 6: Reviving the Hardware
Antique furniture often has unique hardware that adds to its charm. If the hardware is tarnished, remove it and clean it with vinegar and salt. For intricate designs, an old toothbrush can be your best friend. If the hardware is beyond repair, consider replacing it with replicas that maintain the vintage look.
Respect the hardware's history. If cleaning removes some of the hardware's patina, that's okay – it's a testament to its age and use.
Step 7: Gluing Loose Joints
If your antique furniture has loose joints, it's time for woodworking. Carefully disassemble the joint and clean off the old glue. Apply a woodworking adhesive, making sure not to use too much. Clamp the joint together and wipe off any excess glue. Let it dry for the recommended time, and your furniture will be more stable than ever.
Clamps are your best allies in this step. They ensure a tight bond while the glue sets, leading to a more robust and longer-lasting repair.
Step 8: Patina Preservation
The patina, that natural sheen from years of use, is a valuable part of antique furniture's character. When restoring, try not to overdo it and remove this patina entirely. Embrace the imperfections that tell the story of the furniture's journey through time.
Resist the urge to buff away all signs of wear and tear. Patina is what sets antique furniture apart from new pieces.
Step 9: Re-upholstering Wisely
For antique furniture with fabric or upholstery, re-upholstering might be necessary. Choose a material that matches the era and style of the piece. Take pictures of the original upholstery and take measurements before removing any material. This will help the re-upholstering process go smoothly.
Upholstery is a chance to breathe new life into your piece but ensure it stays true to its roots. Research the historical fabrics of the time to find the perfect match.
Step 10: Protect and Maintain
After putting in the effort to restore your antique furniture, it's essential to protect your hard work. Use coasters, tablecloths, and placemats to prevent further damage. Avoid placing the furniture in direct sunlight, as it can fade the finish and the wood. Regular dusting and occasional polishing will keep your restored piece looking its best.
Maintenance is ongoing. Schedule regular check-ins to ensure that your restoration efforts aren't being undone by neglect or environmental factors.
Conclusion
Restoring antique furniture is a labor of love that requires attention to detail and respect for the past. You can bring these pieces back to life with some essential tools, patience, and a willingness to learn.
Remember, imperfections are a part of the charm of antique furniture, so don't strive for perfection. Instead, aim to preserve the unique character and history of these pieces. Happy restoring!